Thursday, August 30, 2018

Lafayette Central Catholic - Sand Channel Drainage – Spartan Sand Cap – A Case Study #4 – In Season Play


Practice began on the new surface on August 1, 2017.  The first game took place on August 18, 2017.  The surface had a shear strength in excess of 30 ft lbs.  We knew it would play well, but even our team was surprised by the results.


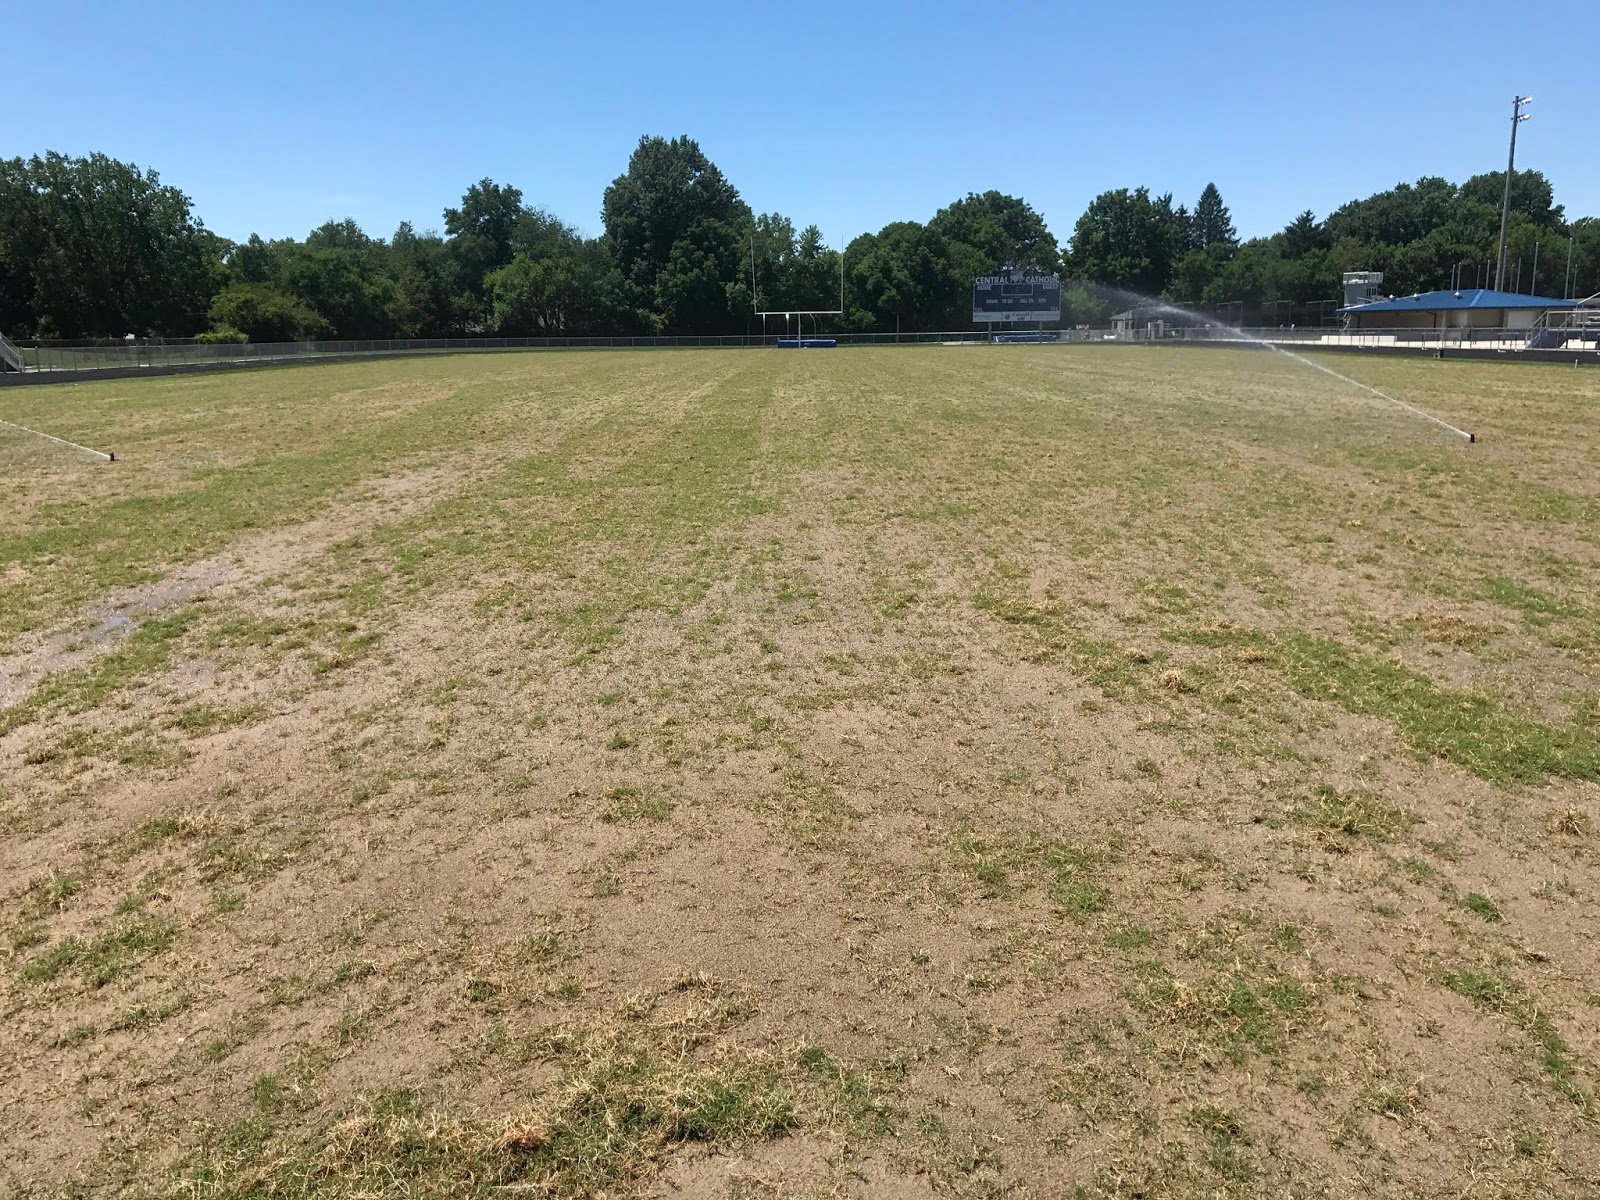
Here is the field in mid September after 10 events.


Per the plan, the surface was overseeded with Barenbrug HGT Bluegrass in early September with a goal of creating a “Bluemuda” playing surface.  A small amount of ryegrass was added for additional color.  Here is what the soccer goal area looked like after the soccer season.


Here is a recap of the grow-in.


The playing surface hosted 50 events (games and practices) from August 1 – Nov 1, 2017.  Why was it successful?

1.      The new surface had a good surface grade.
2.     The new drainage system provided a “rain out proof” playing surface, thus there was never a rain game to tear up the surface.
3.     A blend of warm season and cool season turf provided superior shear strength and wear tolerance to extreme play.

In conclusion, a $130,000 investment provided a rain out proof surface that hosted 50 games and practices in fall 2017.  Quite the return on the investment. 

Go to j-dturf.com to learn more about J&D Turf.

Play on!
--Jamie
@JamieMehringer


-->

Thursday, August 16, 2018

Lafayette Central Catholic - Sand Channel Drainage – Spartan Sand Cap – A Case Study #3 – Grow In


Following the drainage install, it was time to grass and grow in the playing surface.  A granular Ronstar application was made prior to Northbridge bermudagrass sprig installation by Grassmaster Turf Farm on June 7, 2017.  Opening Day was approx 8 weeks away.


Following sprig installation, a heavy watering cycle took place for 14 days.  After the sprigs began to green up the surface was placed on an aggressive grow in program consisting of Foliar-Pak Grow In and Ammonium Sulfate.  Weekly applications were made and the field was mowed 3 times per week at a 7/8 inch cutting height.


June 7, 2017 at Sprigging


June 17, 2017


June 20, 2017


 July 5, 2017
 August 8, 2017


The playing surface as of August 8, 2017 was perfect.  The next question was “How well will it play?”


Go to j-dturf.com to learn more about J&D Turf.


Play on!

--Jamie

@JamieMehringer
-->

Monday, July 30, 2018

Lafayette Central Catholic – Sand Channel Drainage – Spartan Sand Cap – A Case Study #2 – Renovation Process


After the decision was made to install sand trenches and create a 2 inch sand cap, it was time to go to work.

The existing bluegrass/ryegrass/tall fescue surface was sprayed with Glyphosate in mid april and early May to ensure complete kill/control of the undesired playing surface.  Next, the surface was fraze mowed and recycled.


New irrigation laterals and heads were installed.


Finally, in late May, the drainage was installed on 14 ft centers and tied into existing perimeter drainage.


So, the heavy lifting was complete, now it was time to install the 2 inch cap of USGA rootzone sand, sprig with Northbridge bermudagrass and begin the grow-in.

Go to j-dturf.com to learn more about J&D Turf.

Play on!
--Jamie
@JamieMehringer

Friday, July 27, 2018

Lafayette Central Catholic – Sand Channel Drainage – Spartan Sand Cap - Case Study #1

Lafayette Central Catholic High School in Lafayette, Indiana have very successful soccer and football programs.  As a school in an urban environment, space is at a premium.  The school approached the J&D Turf team over the winter of 2016-2017 to discuss options for the stadium playing surface.  Approximately half of the facilities committee was leaning towards synthetic turf, while the other half was leaning towards maintaining a natural grass surface.  The existing playing surface was in poor condition and had no drainage.

 Let’s take a detailed look at how the determination was made to proceed with the means and method that worked for all parties.

“If you don’t know what you have, how do you know how to fix it?”  The first step was to pull undisturbed core samples and send to Turf and Soil Diagnostics.


Recommendations:

The report/data showed vertical drainage (infiltration) at .02 inches per hour.  After the results were discussed, 7 different playing surface options were presented.

  1.    Native Soil – Re-grass over the existing rootzone and maintain at .02 inch per hour infiltration rate (Approx Cost - $10,000)
  2.     Topdressed Sad Cap – No internal drainage, create a 2 inch cap as soon as possible (Approx Cost - $30,000)
  3.     Sand Channel “Spartan Sand Cap” – Install sand trenches 14 ft on center and backfill with a 2 inch drain tile and pea gravel and USGA rootzone sand.  Then install a 2 inch column of sand prior to sprigging. (Approx Cost - $140,000)
  4.     USGA “Sand Cap” Rootzone – Install a 6 inch deep USGA rootzone over a compacted sub base. (Approx Cost - $300,000)
  5.     USGA Rootzone – After installation of 4 inch drain tiles in the sub base, install a 10 inch column of USGA rootzone over a 4 inch column of pea gravel (Approx Cost - $600,000)
  6.     USGA Rootzone with Stabilized Turf – Same construction as #5, but install the turfgrass that is stabilized with synthetic fibers (Approx Cost - $800,000)
  7.    Synthetic Turf – Infilled synthetic turf (Approx Cost $750,000-$1,000,000)

The Decision:

The feedback was consistent from the 2 camps
  1.      I didn’t realize there are options for natural grass.  “I thought it was what we have or synthetic turf.” 
  2.      We play over 60 games/practices in 3 months, this field will be bare soil by the end of the year.  We need synthetic turf.

After many discussions and meetings, the decision was made to renovate the existing surface and install sand trenches 14 ft on center and create a 2 inch sand cap before sprigging Northbridge bermudagrass.  So, option # 3.  Cost of work including grow-in $140,000.  Learn how it turned out in the following posts.

Go to j-dturf.com to learn more about J&D Turf.

Play on!
--Jamie

@JamieMehringer

Thursday, June 21, 2018

Brickdust for an Infield Mix?

Using crushed brick for an infield mix was a practice that was used across the Midwest for a number of years in the 1990 - 2005 window.  The J&D Turf team renovates at least 1-2 fields a year that have brick dust as an infield mix.

First, let's discuss crushed brick.  Brick dust is simply crushed brick.  So, the lack of sand/silt/clay make the material very mobile and dusty in dry weather.  Where did this material come from?  My guess is a number of things:

  1. The cost - in the housing boom crushed brick was easy to find at a low price point - that is not the case today
  2. The color - the bright red color was visually appealing
  3. Ease of installation - just throw if down on top of the existing material
So, what is the issue?  Simply, the material was initially used as a topdressing, but as load after load was installed through the years more than 2 inches of this material was installed.  This would not be unlike attempting to play on 2 inches of calcined or vitrified clay.  After a rain event, it is not uncommon to see a brick dust infield look like the one below:


As you can see from the photos, the high traffic areas (around the bases) are extremely low.  Material has been pushed to the edges from dragging and the ensure smooth edges.  So, what is the solution?  FieldSaver50.  Click HERE to see the blog link on renovating a brick dust infield.

In the future, brick dust has a use on warning tracks where more vertical drainage and a softer surface is desired.  The other question I get is, "Can I use it as a topdressing?"  My answer, no, there are other conditioners that will provide the red color without breaking down, turing into a powder, and staining unifroms.  The best product to achieve the look of brick dust, without breaking down is expanded shale/vitrified clay. 

Let's turn the page, and stop using brick dust as an infield mix.

Go to j-dturf.com to learn more about J&D Turf.

--Jamie
@JamieMehringer

Tuesday, May 22, 2018

Hydrating/Watering an Infield Mix

Summer is quickly approaching and with that comes the need to correctly hydrate infield mix profiles.

Hydrating an infield is important during the playing season to keep the surface more forgiving for athletes sliding across the infield and ensure good ball roll.

Here is a photo journal of hydrating the infield mix at Butler University Baseball.

Initial watering - about 1/2 hour across the infield that is a "hybrid infield mix" of Melton and Natural Sand FS50 and Dura Edge Pro utilizing a 1 inch fire hose with a nozzle that applies water at 60 GPM.  NOTE: An engineered soil is needed to hydrate/water in this manner.


Note the footprint on the bottom of the photo below.  Even with all the water applied, you could still walk across the surface:


This process is ideal after practices and games to allow for hydration of the entire column of infield mix.  This type of watering is best done in late evening to allow for percolation overnight.  Then, lighter watering events can take place during the day.  Watering an infield before a practice or game will NOT be enough to hydrate an infield on a daily basis.

Finally, please keep in mind that water is the best way to create a forgiving infield.  DO NOT work the infield more than a 1/2 inch during the playing season.  this will disrupt the grade and could create unplayable surfaces after rain events.

Go to j-dturf.com to learn more about J&D Turf.

Play on!
--Jamie
@JamieMehringer

Sunday, May 13, 2018

Managing Traffic Around a Home Plate Area - Making a Plate Circle Larger

Baseball and softball seasons are in full swing.  Due to this, traffic around a home plate area can be an issue.  How to address this issue?  Consider making the home plate circle larger.  As a rule of thumb, I like to see the plate larger than the BP cage.  In other words, when the cage is on the field, all the players surrounding the cage are on the plate circle.  How is this accomplished?  Let's follow along below as the plate circle was expanded in Whiting a couple season ago.

The task, take a homeplate that had a 26 ft diameter and take it to a 32 ft diameter.  Also, raise the plate to ensure positive drainage while allowing the pitcher's rubber to be 10 inches above homeplate.    So, let's get to it......

First, the new diameter is measured and a line is painted in the turf.


Next, 4 inches of root zone sand was removed.


Then the plate was raised to allow for positive drainage.  Note the string lines set to make sure the plate is square with the pitchers rubber and the foul poles/bases.


4 inches of Dura Edge Collegiate infield mix was added to the perimeter of the plate.  Dura Pitch Mound Clay was installed in the batters boxes and catchers box.


The plate was then leveled with a board.  Positive drainage is ensured due to the laser leveling of home plate.


The plate was worked up and re-leveled with a bunker rake.


Finally, the plate was tire rolled and a finish drag was performed.


Not bad for a days work!

To learn more about Oil City Stadium in Whiting, click HERE.

Click HERE to learn more about DuraEdge products.

Go to j-dturf.com to learn more about J&D Turf.

Play on!
--Jamie

Tuesday, April 17, 2018

Tricks of the Trade - Dugout Heaters


This year winter doesn't not want to loosen its grip. Due to this fact, many questions have been asked in regards to additional heaters in dugouts.  A trick of the trade used in many cold weather climates are heaters.  Many use propane “space heaters.”  While they do the trick, below is a nice example of a different type of heater in South Bend.  The South Bend Cubs have heaters mounted on the roofs of the dugouts.   A easy way to keep players and coaches warm during the cold spring months.


Go to j-dturf.com to learn more about J&D Turf.

Play on!
--Jamie
@JamieMehringer